| This is one of those model where I did not
really plan to build it.
It just sort-of happened.
I picked up the kit, which included a 47 page booklet on
the C-119, more to get the included booklet. I already had a
number of the older C-119G kits from both Italeri and
Testor. After looking over the kit and the decal
options, I suddenly found myself really wanting to do some
natural metal. Go figure. So, I started it...
I actually had an old SuperScale decal sheet (MicroScale
back then) that provided the exact same sets of markings
that were found in this new Italeri kit. So, the
markings provided in the kit were not new to me. But, to use
the old SuperScale sheet would have meant doing some
conversion work on a C-119G kit. With this new kit, now I
possessed a kit that would built these markings right from
the box without any modifications.
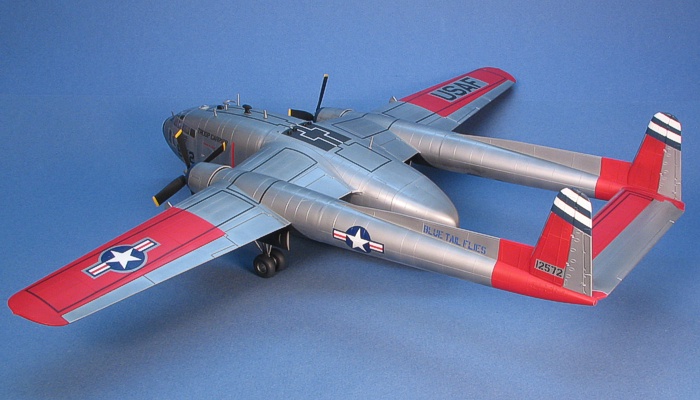 |
The Kit
The kit is an updated version of the long available
C-119G kit from Testors and Italeri. They made
some mold modifications to backdate the kit to a C-119C
standard. The changes to the kit include the following.
 | Italeri changed the molds to update the tail
booms, removing the ventral strakes under the tail. This
is probably the most noticeable airframe change on the
C-119C as compared to the C-119G.
|
 | They then included additional pieces to provide the
single-tire nose landing gear, split sets of nose wheel
well doors, and earlier style engine cowls with
alternate engine exhausts. The original kit pieces for
these additions were left in the kit, so an updated
C-119 with the dual nose wheel can be made from the kit.
|
 | Two other additional pieces are a set of truck ramps
for the cargo door.
|
 | And, since this is a cargo aircraft, they also
provided a complete 1/72nd
scale truck kit to include inside the cargo bay. This is
a nice touch, but not really necessary unless you plan
to open the cargo bay (which I did not plan to do).
|
No other changes were made to the moldings, so the kit is
still raised panel lines like the older C-119G kit. The fit
is above average, which is good on a model that will get a
natural metal finish, but there still is need for a little
filler to completely hide some of the seams.

Construction Begins
| |
 |
| |
 |
| |
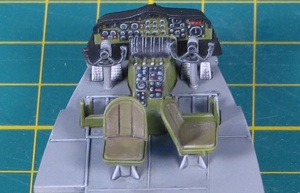
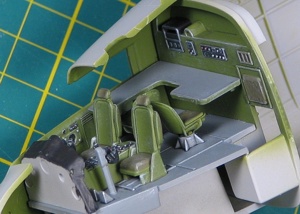
Like most aircraft models, the construction starts with the
cockpit.
The cockpit has raised details and is rather complete.
The only issue in the cockpit is that the map table on the
back wall is molded to sit too high. If placed were the
locators are molded, the side of the table would cut through
the middle of the side cockpit windows. I removed some of
the rear wall details and mounted the map table lower so
that its top surface was just under the windows. This looked
better and in scale placed the table 36 inches off the
cockpit floor. This is about the right height for most
tables, so I felt confident that this was the right way to
go.
When I built this kit before (as a C-119G), I made the
cockpit D.Gull Gray (F.S.36231) since that is the cockpit
color of most modern (and semi-modern) US aircraft. The
booklet that came with this kit had some color interior
images that showed the cockpit was more like WWII aircraft
with interior green as it's basic color. Who am I to argue
with color photos? So, I painted the interior in WWII
fashion with interior green walls and a gray (D.Gull) floor.
Even the instrument panel was green in the photos, so I made
mine green as well, with black instrumentation.
I was not planning to open the rear cargo doors or
forward crew entry door, so I left the cargo bay interior
unfinished. I figured (and turned out to be correct) that
the view through the portholes on the fuselage sides would
not be enough to know whether the interior was finished or
not.

Painting
and Markings
Painting the outside of the model was interspersed with
construction. I was not looking forward to having to mask
off all the tiny round portholes on the fuselage sides. Then
a thought occurred to me. Maybe I should paint the fuselage
sides before I install the windows, indeed, before I even
assemble the fuselage. Then, I can install the windows into
a fully painted section of the fuselage and mask off the
whole side of the model instead of just the windows.
This is the route I took and it worked great. I painted
the fuselage sides, the specific panels where windows were
located, then I installed the windows. Once this was done, I
masked off the entire panels where windows were found and
constructed the fuselage. I then sanded and sealed the
fuselage seams and painted the remaining portions.
This approach worked like a charm and saved me
significant time having to mask each of the tiny round
windows, one at a time. Of course, this process was
contingent on the fact that the windows fit in the intended
holes in the fuselage, which fortunately is true (for the
most part).
I next assembled the tail booms with the center wing
section and horizontal tail. Addressing all the seams, I
then painted the whole tail area prior to attaching the
wings or the fuselage. I also assembled the outer wing
sections and painted them, too. After all the painting, I
then attached the wings to the tail assembly, addressed the
seams, and touched-up the airframe painting. This modular
approach to painting and construction worked well for the
complex shape of the C-119.
The painting of this model is done exclusively in
Testor's Model Master enamels and Metalizers. I
considered trying out Alclad II for the first time on this
model, but I had a bottle break when shaking up the Alclad
and spew paint over half my work area. This soured me to the
idea of using Alclad and I stuck to my tried and true Model
Master Metalizers for the painting.
I used "Steel" Metalizer for the entire airframe. After
gloss coating the model and decaling, I applied highlights
with more "Steel" Metalizer. The clear coats had marginally
shifted the tone of the original "Steel" coating so that the
highlights were subtle. Pictures of C-119s I have seen
showed that they did not have too varied a look to all the
airframe panels, so I kept it minimal on the model.
The finish is far from perfect. This really is a
"two-foot model". I was just building it for fun, not
competition. The nice part about pictures is that I can
control the angle, lighting, and closeness so as not to
highlight the imperfection in the painted finish.
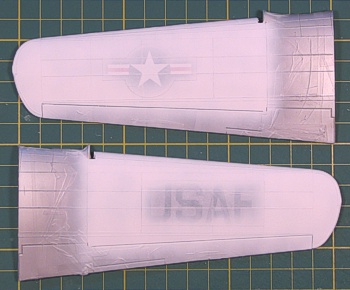
Step 1, Metalized and Decaled |
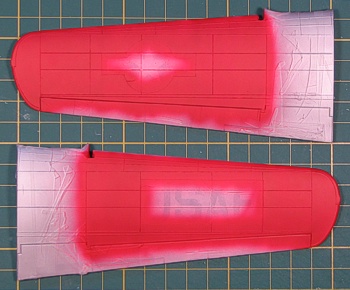
Step 2, Masked and Primed in White |
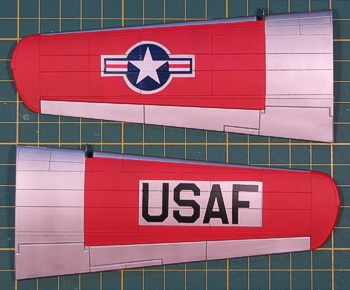
Step 3, Red Painted |
Step 4, Unmasked |
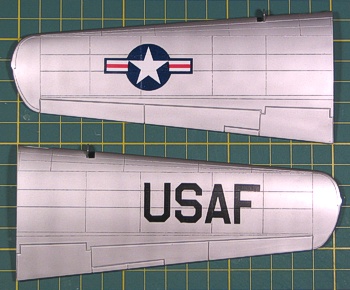
The Arctic Red panels were primed using Insignia White,
then painted in Insignia Red. To do the metal surrounds on
the wing markings, I first painted the whole wing in metal.
Then I applied the USAF and national insignia decals and
masked over them with Parafilm-M, leaving a metal border
around the markings. Only after this did I apply the white
primer color and the red panel color. This approach gave the
markings a better feeling that the surround areas were just
the unpainted metal. I have seen decal manufactures provide
silver printing on the decals for the surround areas, and
they always come off looking like silver paint when compared
to the nice Metalizer found on the rest of the model.
I masked and painted all the unit markings in blue and
white. I did not trust the decals to conform to the tail top
and nose contours. Besides, the nose decal for the "target"
seemed small when I compared it to reference images.
Painting it allowed me to re-size it more closely to the
size of the "target" on the noses of the actual aircraft. I
then masked and painted the black square on the top of the
fuselage along with the black of the engine exhaust areas.
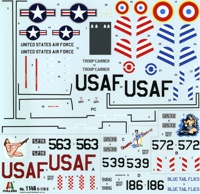 |
|
|
| |
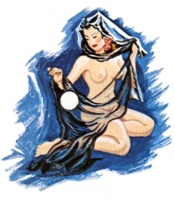
Reference art, not decal.
|
The kit decal sheet is reasonably complete. There is not
much in the way of airframe data, but at least all the wing
walkway stripes are provided. There are four aircraft
present -- three US aircraft from the 403rd
TCG and one French. The French aircraft started with the 403rd
TCG, so it could be built as a US machine simply by changing
the national insignia. The French and two of the US aircraft
have nose art. The decal printing quality is not too badly
done. On close scrutiny, I found the kit decals to be no
better or worse than the SuperScale decal sheet I
have had squirreled away for over a decade for the same
aircraft. This includes the quality of the nose art decals.
I picked and chose between the kit and SuperScale
decal sheets as I applied the decals. Some decals were
printed better on the kit sheet, while others were printed
better by SuperScale. I decided I liked the
SuperScale version of the nose art just a tiny bit more
than the kit version. To separate the tail numbers from the
silver backings, I printed up my own custom decals for the
numbers.
People addicted to true authenticity in modeling
should not read this next paragraph.
I took some artistic license on the model. I marked the
aircraft so it is from the 64th
TCS (with blue trim) but applied nose art from a 63rd
TCS aircraft (which wore red trim). I liked the look of the
blue trim on the aircraft better than the red, and I really
wanted to do this specific art work which I felt accented
the blue trim markings nicely. This art work really belongs
on a red trimmed aircraft, but I felt the red trim was lost
in the arctic red panels. I accept whatever judgement is
handed down from the authenticity police.
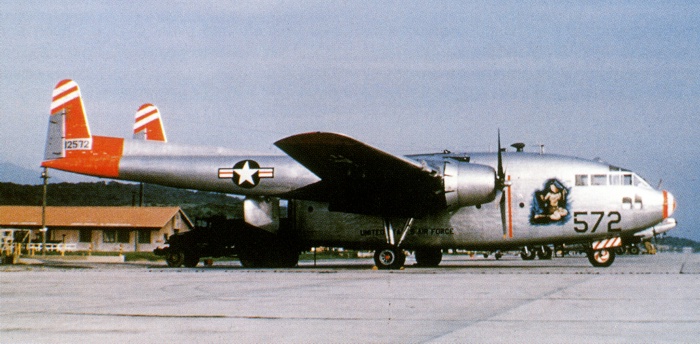
The following is an image of the actual aircraft that got
this nose art...
 |
For weathering, I used my typical style of thinned down
enamel paint washes and air brush shading. I finished the
weathering with some dry brushing to pop out the surface
details. For a more complete discussion of what I do to
weather my models, see my posting on
"Weathering Aircraft".

Construction Continues
As part of the painting, I slowly got the entire airframe
assembled. It was as the model was finally assembled that I
realized I was too quick to assemble the fuselage. I had
placed no weight in the nose! I refused to build a
"tail-sitter" and endeavoured to fix the problem.
Fortunately, I had not attached the rear clamshell cargo
doors, so I had access to the cargo bay.
I constructed a small styrene box from scrap plastic,
sizing the box to be sure it would fit in the cargo bay. I
filled this box with lead shot. After testing the balance
and enlarging the box to add more lead shot, I finally got
enough weight to balance the model and glued the box in the
front part of the cargo bay. This would have been so much
easier if I had remembered to stuff the hollow nose areas
with lead...
With the airframe fully assembled and painted, all that
was left were the millions of details that never seem to end
in order to finish a project -- landing gear, antennae,
propellers, navigation lights, etc...
To get the model up off its painted finish, I started
with the landing gear. I painted the struts and wheel hubs
in Steel Metalizer. I painted the rubber tires in Engine
Gray (F.S.36076). The kit landing gear is nicely done and
plugs right into the wheel wells. The single wheel nose
strut (part of the C-119C specific parts) caused no
problems.
I really broke the out-of-the-box rules when it came to
the antenna fit of the aircraft. The fit provided in the kit
is the same as that found on the C-119G (which is what the
base kit started life as). I wanted to change the fit to
match that of a C-119C. I did the following to change the
antenna fit:
 |
One of the biggest
changes was the inclusion of a DF "football" antenna on
the upper fuselage. I obtained this from a 1/72nd
scale B-24 kit. I filed down one of the molded antenna
humps and replaced it with the scavenged "football"
antenna.
|
 |
Another change is the
inclusion of a blade antenna in front of the windscreen
on the upper nose. I scratch-built this from 0.015"
strip styrene and attached it using a fine brass wire
pin.
|
 |
The C-119G has two pitot
masts (I guess that is what they are) on the nose that
look like cat's whiskers. C-119Cs do not get these
masts. So, I used these two masts provided in the kit to
rebuild different masts for the upper fuselage so the
line antennae would go in the right places.
|
 |
The line antennae are
hair from my wife. I tried using fine wire and stretched
sprue, but neither would work. The real culprit was my
aging super glue that took too long to set up. The wire
was too springy and would not stay tight until the glue
set up. The stretched sprue was too brittle and broke
before the glue set up. Since my wife had recently cut
her hair short, I gave in that maybe I just would not
put line antennae on this model. Then, searching the
bedroom, I found a spot that had not been cleaned
recently and in it was some long hair. Human hair is
tough and resists breaking, so I could get the line
tight and keep it tight until the glue finally set up.
Then, I just painted the lines black with a small paint
brush. |
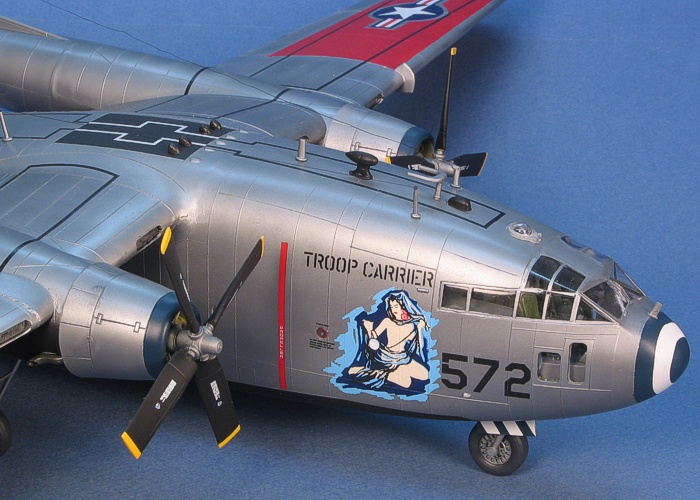 |
The revised antennae make this C-119C look a little
different -- OK, a very little. But, this way I will have
that much more to make it look different when (if) I build a
C-119G model which will also be metal with red visibility
panels.

Conclusions
As I wrote at the top of this posting, this was a project
that "just happened". Along the way my interest in the
project started to slack off. I needed to push a little to
get the project done. It is far from being competition piece
quality, but then that is not what I was looking to create
when I started it.
While not Tamiya or Hasegawa quality, the
Testor/Italeri C-119 kits are all very nice kits.
I would recommend any of them as easy hobby enjoyment.
|