Background
I will let this excerpt from Dan Johnson's excellent Luft '46
explain the background of this unique design.
ďVery little is known about this VTOL (Vertical Takeoff and
Landing) project. The entire aircraft had an airfoil section, and
there were two huge propellers located in the center of the
aircraft. They rotated in opposite directions, thus canceling out
torque problems. At low speeds, control was achieved by varying
power to each propeller.
Power was to be provided by an unnamed turbojet, and forward
propulsion was brought about by sending exhaust through a nozzle
located on both trailing edges. The landing gear was very simple,
consisting of two main gear legs on either side of the center
propellers, and a small tail wheel. A single fin and rudder was
provided to help with lateral stability at higher speeds.
The single pilot sat in a cockpit nacelle that protruded from
the front of the airfoil section fuselage.
Nothing ever came of this very interesting project.Ē

Unicraft's 1/72 Fw VTOL
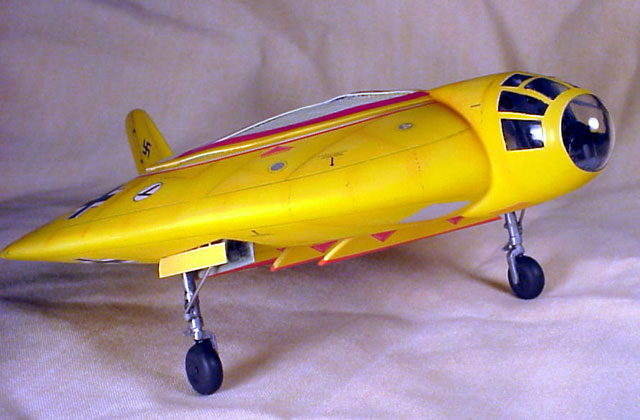
This is Unicraft's 1/72 scale Focke-Wulf VTOL Project Aircraft.
Understanding that Unicraft is a small cottage
manufacturer belies the scope of this current project. I was
understandably awed when the packaged arrived with this kit in it. It's
big! It could be mistaken for a 1/48th-scale kit as it dwarfs a Me-109
of a similar scale. Cast in the now standard cream resin, all parts are
very well formed with no painful air bubbles that I could see. Decals
and a 4 part clear canopy are also included as well as a very complete
set of instructions.
The first task is to lightly sand the two largest
parts that make up the main fuselage. Don't sand off too much, or the
trailing edge, which is a separate item, will not blend into the overall
cross section. Yes, there was a problem with my sanding pressure, but
some corrective and innovative actions made up for that mistake. Nothing
like side stepping instead of moving forward on a project. Some Bondo-action
was naturally required at some of the seams, don't think this kit will
fall together unless you have a plan of action either. Concentrate on
what the kit will look like, and then take steps to achieve your vision.
There are plenty of areas where details can be added, one of which is
the cockpit area, add some sprue, side panels, a seat and poof!

Most of the kit can be assembled by normal means;
the canopy is an area that requires a bit more imagination when it comes
to assembly. A four- (4) piece structure is presented in very clear, but
very thin vacuformed plastic. I could not imagine taking the time to
piece these things together successfully, but I could be wrong. Instead
of trying, an alternative idea was to assemble the canopy masters
provided in the kit into a completed canopy. From this point, squash
mold a one-piece canopy out of thermoform plastic and test fit to the
model. Remember the large amount of clear material means a lot of the
interior will be seen.
Some of Igors' friends designed artwork for this
model, and very attractive designs they are. Some I have seen show a
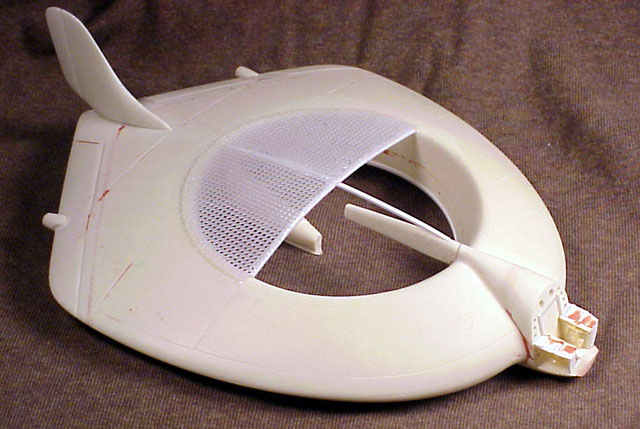
safety screen over the large intake on the top of the craft. Its very
cleverly painted in white and red, which looks wonderful next to the
prototype yellow overall finish. I had to have this look on my completed
model, at all costs. Well, it didn't take a lot to achieve the
structure, if indeed you think it looks like it. Some plastic screening
used in rug making and needlepoint was cut into the appropriate size
circle to cover the opening, about 90-mm wide. This was in turn cut into
4 pie sections. Some underlying support beams are glued at 90 degrees to
each other; the screens are then glued to these beams to form the top.
It actually has a slight domed shape to continue with the cross section
of the fuselage. The 4 pieces are glued to the supports in such a way as
to create the domed screen. Later, the edge of the plastic screen was
faired into the upper surface with a thin round plastic ring, later to
be embellished with the red and white warning colors.
All the extra work of the screening does not have
to be done; Iím just a masochist and enjoy pain. The completed model
will look wonderful if built from the box, so if this extra bit of
modeling sounds scary, well, it was. Iíve gone over the edge, and would
have been most happy just to finish this model and go one with the rest
of my life. When it came to masking the canopy, some Black Magic masks
from an Arado-234 were altered, but other forms of masking would have
done the task. You as a modeler have some artistic license with this and
every Unicraft Luftí46 kit thatís available, thatís the unique pleasure
of building these kits, no two are ever the same.

Painting and Decals
Next and foremost is the paint scheme, prototype
yellow. I used this scheme even though I doubt that Focke-Wulfe ever
really used yellow - not one to disregard the artwork.
A bottle of Testors RLM 04 was used to cover the
entire airframe; interior of the ducted fan was RLM 66. A lot of work
went into the yellow, as yellow is the hardest color to paint with for
some reason. Itís even printed on the bottle: ďThis bottle of yellow
04 paint will totally fail to cover completely, will pick up dirt and
dust, and is guaranteed to dry as slowly as possible.Ē
Needless to say, some choice words were spoken
using yellow paint.

Decals are supplied by Unicraft, but for my
alterations some added rings and warning emblems were printed on the
Alps printer to match the box art. This in itself was a task, but after
all was said and done, it looked pretty sweet. Out came the Future floor
wax. What a wonderful product. I pity the modelers who do not have the
availability of this remarkable modeling item. It also does a nice job
on your kitchen floor, too! After numerous coats of Future where drying,
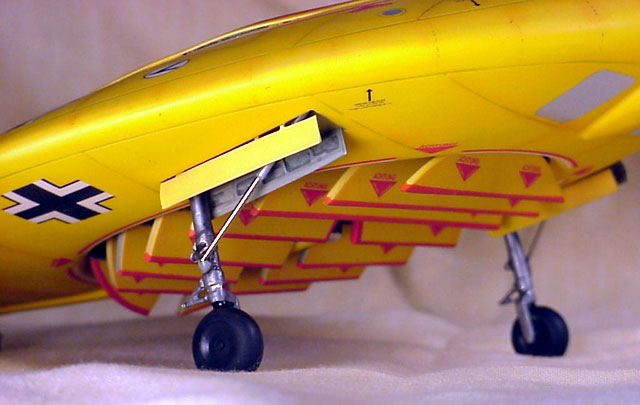
attention was turned to the ducted fan louvers which directed the
down-ward flow of air which in turn was supposed to lift this Behemoth.

Finishing Touches
Unicraft supplies some well cast airfoil shaped
louvers, but I opted to cut a circle out of sheet styrene and make some
new ones, call me silly. The resin louvers had some bends, which needed
to be taken out, not my favorite job. They will hang partly open on the
finished model, suspended on a small ridge of plastic strip glued around
the inner circumference of the duct, near the opening.

Not a lot of detailing was done to the fan blades
or the inner duct, the screen effectively blocks viewing from above.
Landing gear, every airplane whether real or
imagined needs it, and a good looking set is supplied for the VTOL. They
look sturdy enough to support the model, which doesnít weight as much as
some resin kits of this size.
If you look closely, a small decal of a German with
a beanie cap emblem was put near the canopy. I was having some fun with
the decals for sure.

Conclusion
This model is definitely the highlight of my year.
Call it Sci-Fi. Call it what you will. I call it 10 out of 10 on the
cool meter.
Donít let the difficulty rating of 8 stop you from
buying one of these beauties. A little patience will do wonders, and who
knows, you might improve some of those modeling skills.
Thanks to Unicraft for making this joy possible.