Background
One of the more intriguing finds at the end of WW
II was this enormous four-wheeled vehicle made by Krupp.
Listed as a Räumer S, it is still debated as to
what exactly was this thing supposed to do. Was it a heavy prime mover,
a mine clearing vehicle or somebody's nightmare turned into metal? The
tall ground clearance and heavily armored cabin leads me to believe it
was a mine clearer. The double-ended feature allowed it to drive back
through a minefield without having to turn around. 180º in zero feet!
What I thought was weird was the highly exposed
hinge mechanism under the middle of the vehicle. Surely any exploding
mine would damage the hydraulics and jam the hinge pins with dirt and
shrapnel. I’d like to see one of those girlie Monster Trucks try and
take on this beast!
Oh well, on to the kit.

New Connection Comes Through
I originally saw a build up of this kit in Military
Miniature in Review #25 and I had to have it. I visited New Connection's
website (now in English) and after taking a sizable chunk out of my
credit card, the kit was winging its way to me. The box covered in
German Postal Stamps was smaller than I expected. I feverishly opened
the box to find it filled to the brim with carefully wrapped resin
parts. Three-ziploc type bags carried the smaller items with the larger
castings lovingly wrapped in bubble wrap and secured with red rubber
bands.
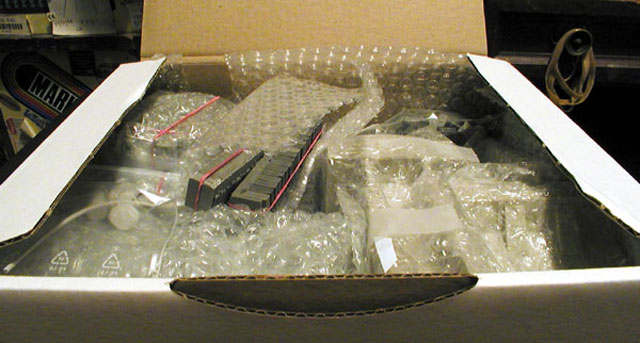
All the larger castings had the pour blocks already removed. The cabins
were large castings with open doors and bottom. The wheels were cast
with one rubber pad integrally molded in. The rest of the rubber pads
were contained in specifically designed and molded trays that protected
the fragile end connectors from damage. Now that is what I call
thoughtful packaging. Enough of this already let's start gluing resin!

Resin Dust Flies (Where’s the bug spray)
Assembly started with the engine pods. I cleaned
off any flash from all the joins to make sure all the parts fit
perfectly. Three of the doors on the cabin modules were glued shut. This
is the only area of the kit where I experienced fit troubles. The door
openings were a little uneven and the walls were molded thin to appear
to scale. This caused me a some grief when I tried to enlarge the
opening to match the doors, modelers with ham fists should wield dull
blades. I filled the resulting gaps with Zap-A-Gap and sanded them
smooth.
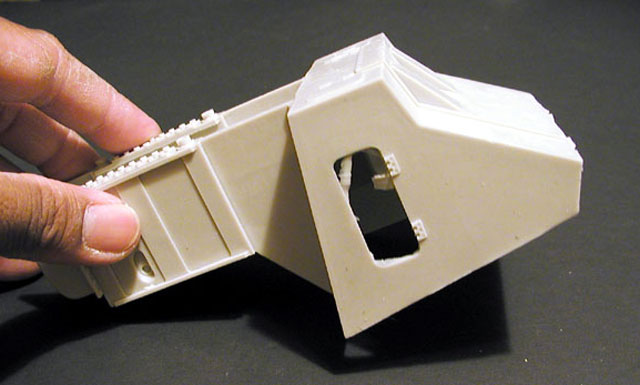
I was able to assemble the entire vehicle frame
within five days.
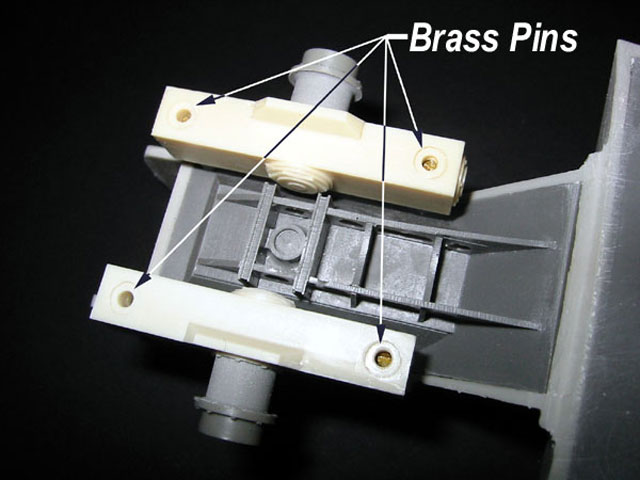
The suspension base had several locating pins
broken off in transit. These were superglued and pinned in place with
3/32" brass rod. The axles were also pinned to ensure the glued joins
don't snap. Drive shafts from the engine were not included in the kit.
There is a mysterious port in the sides of the
hull. I didn’t know what these were for until I checked Walter
Spielberger’s book, Spezial Panzerfahrzueg. There is a cutaway
drawing of this beast and it shows the drive shaft turning a sprocket
located inside the wheel that engages a cog along the inner rim of the
wheel. Those wacky German Engineers! Anyway back to the drive shafts,
these were made from two sizes of plastic tubing. The thinner of the two
was inserted into the port in the hull and cut short of the wheel. The
outer tube was slide over this shaft and when the wheels were finally
glued to the hull, the outer tube was glued against the wheel. Neat and
flush without all the test fitting! I am so lazy!
The most difficult part of the assembly was the hinge point. You have to
make sure you get all the parts in the right place before glueing
anything together. Test fit thrice, glue once.

Dark Side of Yellow
This was one of the few armor models I used an
airbrush to paint. I tried hand painting one end, but after an hour and
the second coat of paint, laziness gave way to speed.
I sprayed the model overall Polly S Dark Panzer
Yellow. Then a meandering green camo was sprayed on using Polly S NATO
Tricolor Green toned down with Panzer Yellow. I know it ain’t the
“right” color, but my Panzer Green had dried up in the bottle. I hand
painted some Red Primer as the Panzer Red Brown to add contrast to the
sprayed on green. Truthfully, I’m not happy with the way it looks. I may
repaint it again in the future.
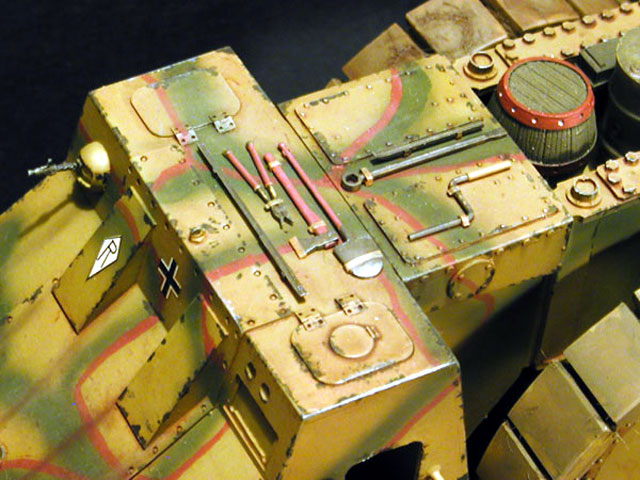
I gave the model a wash of burnt umber oil paint. I put the wash over
the entire model, not just in the nooks and crannies. This has the
effect of unifying all the colors and making the model look less garish.
I mean c’mon, green, red and dark yellow? Christmas colors at the very
least and wrong wrong wrong for this season. I just shiver. I mixed a
little pastel brown, red brown and black with Tamiya Thinner and added
streaks to the paint job and more depth to the shadows where needed.
Straight pastels were used on the mufflers to get the brighter orange
rust color. Chips in the paint were added using Testors' Metalizer
Titanium and a pointed brush. The lower edges of the hull and wheels
were lightly sprayed with Polly S Dirt. I mixed Polly S Dirt, Future,
Tamiya Flat base and static grass together and applied it to the lower
edges of the hull and to the wheels.
The markings came from various sources. The national markings and
vehicle number are from Tamiya's Marder III kit. The diamond R from
CMK's VW Bug and the license plate from Tamiya's Kubelwagen kit. All the
decals were applied directly to the flat paint and settled in with
Solvaset.

Home Base
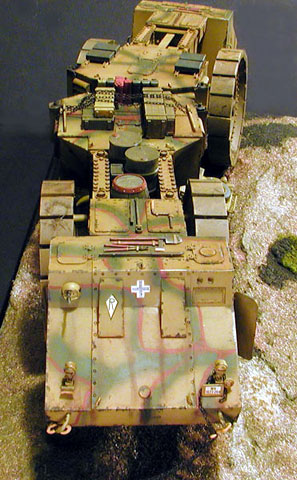 With
a model this big and “flexible” in the middle, I felt the need to put it
on a base. This allows me to glue the wheels and hinge permanently
giving the model more strength. If I left the hinge workable, there
would be too much temptation to “play” with it and breaking it in the
future. Makes me wonder when I’ll grow up.
I walked over to Daiei Store and found a 16”x 8” picture frame, perfect.
I got some Florist Foam and fitted it to the inside of the frame.
Basswood walls were created to give me a guide for carving the roadbed
as well as making the edges neater. I carved the foam until I got a
slightly curving and rising roadbed. I covered this with Plaster
carefully forming the road and the drop in the lower left corner. A
straight and level road, though easier, is too boring.
After drying overnight, I sprayed everything Gloss
Black, frame and edging inclusive. Three coats of Gloss Black sealed the
plaster for the subsequent colors. The roadbed was then sprayed Polly S
Dirt to represent the dirt roadway and the soil areas Polly S Olive
Drab. Woodland Scenics static grass and foam grass was added to the
roadsides.

We Don’t Need No Steenkin’ Details...
Despite the size and cost of the kit, there were
precious few details to be added. This may be due to the fact that the
original never developed past the prototype stage. I couldn’t allow
this. I decided to hypothesize what equipment would be needed on the
operational vehicle and add it to the model.
First on the agenda are some lifting hooks for the various access panels
and covers. Considering the size and position of some of these, it’s
safe to say these are necessary items. Next I added some handrails. The
crew has to get up to those little doors out in the field without the
benefit of a ladder somehow.
For self-defense, I added leftover Kugelblende from Dragon’s Pz III
kits. Tools came from several Tamiya Pz IV OVM sets and the wooden boxes
from Trakz 1-1/2 ton GMC Cargo set. The barrel and 55-gallon drums are
from Verlinden. The leftover rubber pads from the wheels were added to
the engine deck on rails made from Evergreen H-stock.
I added tow loops from wire solder to the front of both cabs. I figure
they have to tow this thing once in awhile, maybe with five FAMO’s? Two
S-hooks and some chain were added to the front cabin.

Man That’s Big
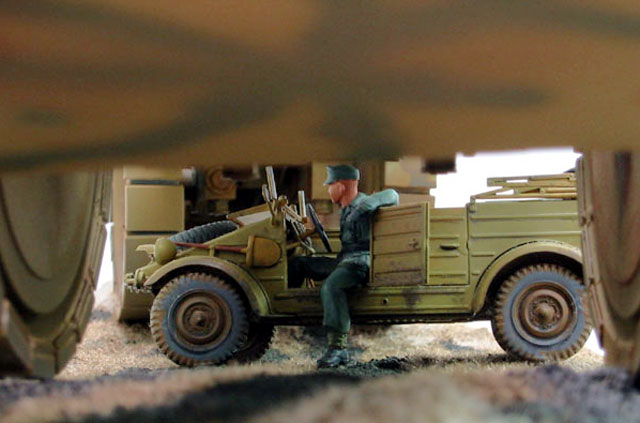
I added a Tamiya Kubelwagen under the Räumer to
lend a sense of scale. This entire project took me 3 weeks to complete.
I rushed to get it ready in time for the IPMS-Hawaii armor night.
Anybody got a 1/35 scale VW Bug they need Monster Krupp’ed?
