Background
Operation Torch Trumpeter 1/32 SBD-3 kit # 02242
The career of the SBD is very well known so I won't bore you with it
here except to note that the decal sheet by Yellow Wing Decals is of
SBD-3 Bureau number 06624 that fought in the Invasion of North
Africa (Operation Torch) in November 1942 hence the yellow
recognition markings around the national insignia.
I like this scheme since the dramatic contrast of Insignia Yellow
with the very dark Insignia Blue of the national insignia really
complements the Non Specular Sea Blue upper surfaces and Non
Specular Light Grey lower surfaces making for a very attractive SBD.

The Kit
Operation Torch Trumpeter 1/32 SBD-3 kit # 02242
This is Trumpeter’s superb 1/32 SBD-3/4/A-24A which went together
wonderfully. The kit is great and looks very accurate and the detail
is very impressive, especially in the cockpit. That even includes a
very tiny, separately molded signal flare gun!

Yes the rivets should be protruding, not sub flush but after
painting the effect looks really good so I am not going to join the
riot over that.
I am not going to review the kit in detail, that has been done
before but I did like how well it fit together with little putty
needed. Trumpeter did a fine job and hopefully future kits will be
up to this standard.
The purpose of this article is twofold. One part is to display the
new Yellow Wings decal sheet
32-027 on a 1/32 Trumpeter SBD-3 and the other is to talk about some
weathering techniques modelers may find interesting.
I picked out this kit since I am a 1/32 kind of guy and also since I
worked for 10 years in the very building in El Segundo, CA where
this plane was built. The metal channels in the floor that guided
the dollies that the SBDs were moved on are still there! Today, the
aft fuselage of the F/A-18E/F is built on the same floor space. It
is remarkable that over 60 years later, U.S. Navy attack aircraft
are still rolling out of the same factory a few hundred feet south
of the LAX airport.

Painting and Markings
The model was finished exclusively with Testor’s Model Master
Enamels which I have used for decades with great success.
I sprayed it all with a Badger 150 medium tip airbrush powered by an
air compressor. I thinned the paints with Model Master thinners and
used Model Master Dull coat airbrushed on.
Many modelers paint their models, brush on Future, decal it, brush
on more Future, and then apply a flat coat. I did it a little
differently to get a better effect.
After painting the lower areas FS 36440 grey and the upper FS 36176
intermediate blue grey which is a good match for the non specular
blue grey, I didn't Future immediately.

The rudder, elevators, and ailerons were painted a much lighter
shade of FS 36176 blue by over
spraying with neutral grey FS 36270 heavily thinned to simulate the
considerable fabric area paint fading as shown in photos in the book
SBD in Detail and Scale by Bert Kinsey.
I then used a mix of Raw Umber and ordinary paint thinner for
enamels from Walmart which is much less “hot” than airbrush thinner
and less likely to lift the paint. This was used before the Future
to subtly trace panel and rivet lines on the underside without the
preshading effect which makes some models look like grandma’s quilt
but doesn't look like real aircraft. If you are a heavy preshading
fan, go for it. It’s your model and enjoy it as you will.
Raw umber was only used on the lower surfaces and was also used to
make convincing oil seepage stains in a number of places. I think of
a model as a 3D painting and like to use colors that give the
overall effect of color and scale accuracy as well as “depth” to the
model by slightly emphasizing panels, access hatches, and surface
features. If this is not done, the model has a “flat and blank” kind
of effect since it looks too clean and doesn't have the “depth” that
a real used, dirty aircraft has.
It is important to note that I did this BEFORE Future to get a nice
bit of diffusion of the color around panel lines and hatches and to
simulate seeping oil stains from the radial engine. You can apply
washes after Future (which I also did) but I like the subtle effect
of the “staining” action of washes applied to particular features
instead of just overall coating which comes later.
For the upper surfaces, I used a thin mix of the same thinner but
with Flat Black to pick out panel lines, access hatches, hinges,
etc.
I didn't use umber on the top since black would work much better
with the darker blue while umber complimented the light grey
particularly well and really looked like oil stains.
After all this was done, I wasn't done with the washes. I then
applied Future over the entire model EXCEPT the fabric control
surfaces. I left those uncoated since when Future is applied then
dull coated it leaves a very, very slight sheen which looks just
like flat paint on metal should look. I left the control surfaces
with flat paint only so they would look very flat when the model was
complete, just like fabric.

After the Future was dry, I applied the Yellow Wings decals for the
Operation Torch SBD-3 #13 from VS-41 which was recovered from Lake
Michigan and restored. It is now in the Kalamazoo Air Zoo Museum. I
downloaded photos from the internet of it to help with references
for painting. Yellow Wings includes a three page fascinating and
very detailed history of 06624 in the decal package which also
includes photo copies of the USN history card and the accident
report for its Sept 19, 1943 swim in the Great Lakes.
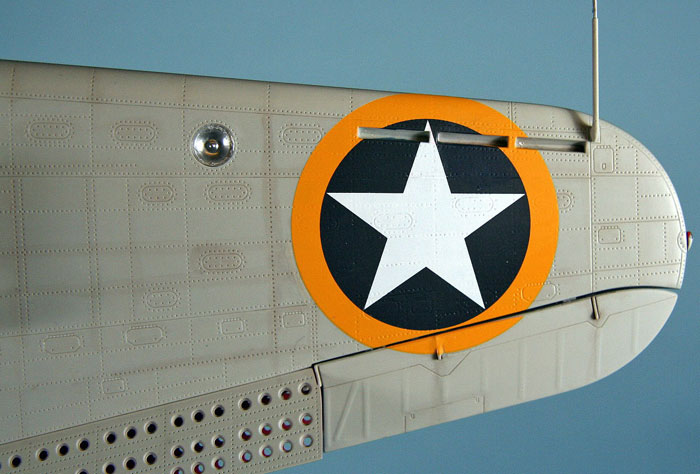
The decals went down very well with a bit of Microsol. The fuselage
national insignia even worked without “going nuclear” (using
Solvaset).
I did have to do a few Microsol applications and prodding for those
however. The decals are beautiful and the colors are spot on. The
only problem was a very tiny bit of off register on the national
insignia on top of the wings. It look like a tiny bit of silvering
but isn't. No major problem. You must look very closely to see it. I
did have to use a sharp X-Acto knife to slice the wing decals to
conform to the wing slots for low speed control. No decal made could
conform to those holes but it looked very nice when done.
I added the bureau number and aircraft type decals to the rudder
without Future and there was no silvering.
The decal sheet is interesting in that it provides markings for the
entire career of the airplane and has many super stencil markings as
well. I would have liked more placement info on the instructions for
those since I was using three reference books and didn't find where
all of them went. I really liked the decals overall and I highly
recommend them. I am glad Yellow Wings is doing so many 1/32
subjects that have been neglected in the past by manufacturers. We
modelers appreciate it.
After the decals were all in place, I brushed on another coat of
Future except on the control surfaces.
I then continued with more black/thinner washes on the upper
surfaces to bring up panel line depth a bit more, add scuff marks on
the wing from ground crews and also to dull down the insignia so the
plane isn't weathered with the markings miraculously pristine! Note
that all upper blue parts need the wash including the canopy frames,
mast and anything you add later to keep everything the same shade of
color. You don't want any parts looking too “light” compared to the
others which would spoil the effect.
I the sprayed the SBD with Testors Dullcoat with my Badger 150
airbrush with a medium tip. I also dullcoated the control surfaces
since I learned years ago; if you don't, the decals will fall off
like autumn leaves after several years.
I didn't do any chipping on the model since these aircraft were
pretty new in Nov 1942 so they would be “in service dirty” but not
flogged to a very worn appearance. The Navy also had to keep after
exposed aluminum which would quickly corrode in the salt air on a
carrier.
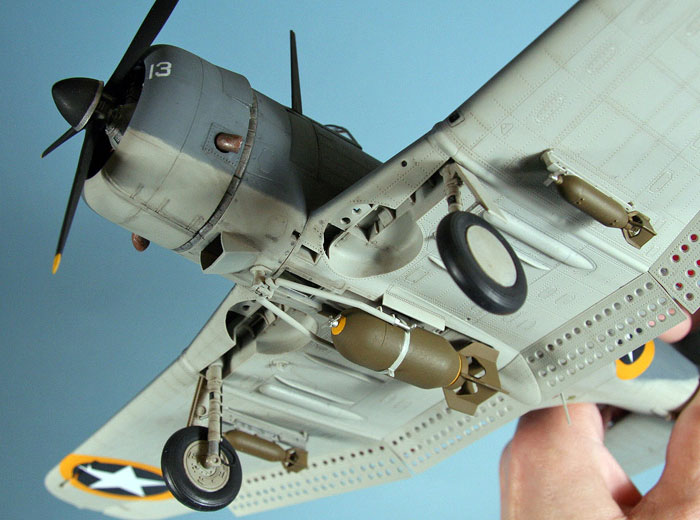
The bombs were painted Olive Drab with the fuses aluminum. Note that
the bomb racks are only partly painted grey like the rest of the
lower surfaces. The mechanism is actually painted steel and washed
with flat black and thinner.

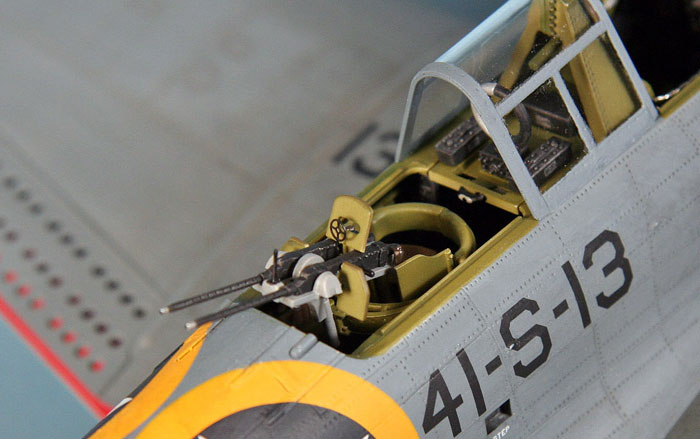
It helps to spend time with the reference information to see the way
the airplane is really painted and featured. Small details add up to
a much more realistic model representation of the actual airplane. I
only used period photos when possible as well as shots of the
Kalamazoo SBD restoration. I assumed that since they went to such
great lengths to make the restoration correct that they had
documented all the features and colors as found. Beware of current
flyable restorations; they are not always per original specs.
The reference I used were Bert Kinsey’s God send, The SBD in Detail
and Scale. Also Squadron’s The Dauntless in Action and The Dauntless
Walkaround.
I also surfed the internet for more info including how to build and
paint the twin 30 cal. Gun mount accurately.

The Engine
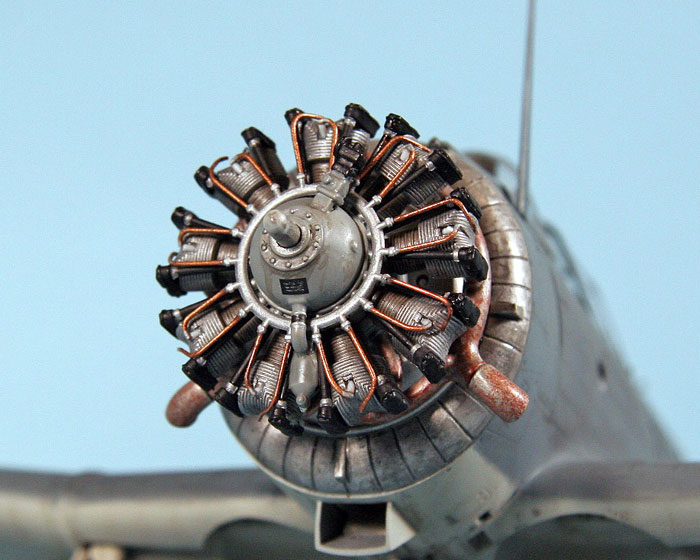
Is the very nice kit engine with scratchbuilt sparkplugs and wires.
The plugs are Evergreen plastic rod and the harness is copper wire.
The engine cylinders come with the holes already drilled out for the
plugs. Just make them and glue them in!
I painted the engines case Neutral Grey FS 36270 with a bit of PRU
Blue to give it the correct color and weathered it with a bit of
umber/thinner mix oil seepage. Bolts heads are Aluminum paint, and a
decal was added from the spares box for the data plate. The
cylinders were painted Aluminum with the cylinder head area having a
black/thinner wash to bring out the cooling vane detail and the
cylinder shank having an Umber/thinner wash for heat discoloration.
I did a bit of Umber wash to simulate oil seepage form the engine.
It is a Radial after all.

The Detail and Scale book along with the Walkaround book helped a
lot on engine detailing and painting. It was important to do the
different colors of washes carefully on the engine to really make it
look great. The engine was very well done by Trumpeter and not just
“kind of like” an R-1820.
The exhaust tubing is painted Steel with rust paint drybrushed on.
The fire wall is Steel with black/thinner wash to give the grooves
depth and make it look nice and dirty. I did not flat coat the
firewall or exhaust stacks to give them a “metallic: look.

The Canopy
Of course, it was dipped in Future along with all clear lenses
before proceeding. This was masked with Bare Metal Bright Chrome
Foil and which works superbly. I did have a tiny bit of foil glue
residue which cleaned up nicely with a Q-Tip moistened with WD-40.
Don't get that on the paint!

The Cockpit
I painted this with a mixture of Green Drab FS 34086 and Medium
Field Green FS 34095 to keep the color “dulled down”. I didn't want
the interior to be too bright green which would ruin the scale
effect.
The instrument panel is flat black with the instruments on kit
provided film which I backed with a piece of white typing paper so
they would show better. The ends of the telescope were drilled out
and lenses painted. The standby compass on the forward canopy has
the markings written in with an artist’s grey pencil then the lens
gloss coated. That was a ridiculous bit of detailing but I love that
kind of thing.
The ADF loop was kit supplied and is half aluminum and half flat
black. The radios were painted flat black with grey artist pencil
detailing to pick out their features.

Conclusion
I had a great time building this kit since it was free of the usual
fit frustrations. It looks very accurate according to my reference
materials and I have to applaud Trumpeter for doing the detail work
to get this kit right.

The Yellow Wings Decals are highly recommended and have an expanding
line of much need subjects in the pipeline.
I started this project intending to do an Operation Torch SBD-3 but
dreaded having
to mask the yellow surround markings. Yellow Wings came through
right on time when I was ready to apply them. I can't ask for more
than that!